Friday 28 October 2022

Drive & Fly handmade album


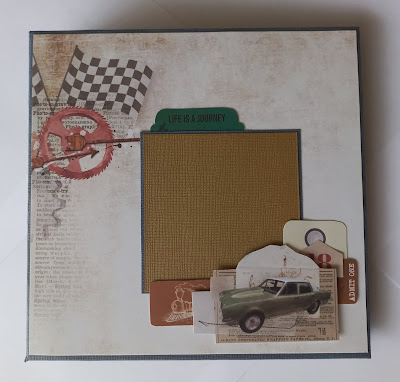
 I always end up with a few pieces of paper and embellishments form paper kits and packs that are too many bits to throw out and I am over trying to think up ways to use up the last bits. I also have plenty of cardstock so the perfect solution - a fabulous handmade album. 

The album has 6 pages - 20cm x 19cm and I have 30 photo mats. I have mainly put in portrait photo mats as that is what i usually end up with however you can make more landscape if you want. You can also add more photos as I Have left room for a lot of embellishments that I wanted to use up. You can add more or less photos as you want to. I have also left negative spots for journaling. 

Making the alum is very easy  and it wasn't difficult to get a very clean looking album which doesn't end up being with pages not aligned. Happy to share my measurements and tips to put together. Just send me a message and I will send the links to the 'how to make'. 


Sunday 22 May 2022

iCraft Australia Woodland Cuteness


Time for some cuteness with a tag featuring the cute squirrel from the iCraft Decoupage range. I cute out the larger squirrel on the paper as well as some leaves from the flimsy paper and some flowers from the Country Garden Range. I had some left over from other projects. 

Using a brown chalk paint, randomly paint the tag. You don't want it to be covered perfectly. Stencil randomly over your tag with modelling paste and chalk paint - Stewart House Brown. To thicken it slightly and add a metallic tone, I mixed in Gold Metallic wax. Leave To dry. 

Paint your wooden embellishments. I was using left over pieces. Cut a small piece of Pearly String - I used Gold. snip each ball and put in a small amount of red alcohol ink to change the colour.  

Put together by mounting the squirrel on some foam pieces to raise it up but remember to leave room to slide the wooden embellishments under. Add the flowers and leaves. Finish off by flicking some of my favourite chalk paint over the top - Coconut Milk. Finally add your pearls. I have only added a few but you can add as many as you want. 

I hope you have enjoyed. I have put links to some of the products below however, click on the link below to the full range of products:


Thursday 21 April 2022

iCraft Australia Shades of Grey with touches of colour


Time for some shades of grey. We don't always think of using grey, black and white as a feature but sometimes it is just right with a touch of colour. 

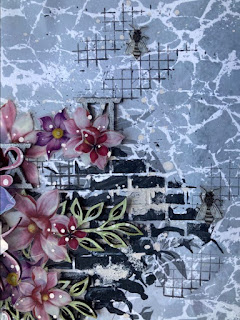
I chose the gorgeous fantasy paper and with some mixed media created a page that was perfect for a black and white photo. 

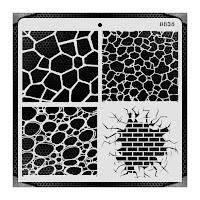
Start with the base page and using black gesso and modelling paste, randomly stencil across the page. Once dry, check where you will put your photo and embellishments and add more stenciling if you need to. 

I added the beautiful Moon white alcohol ink and dripped over some of the stenciling to break up the blackness of the bricks. Add some alcohol blending fluid to help spread the white ink. This will dry very quickly. To finish the base page, I randomly stamped the iCraft grid stamp over the page. It helps to add visual interest. Set aside. 

Fussy cut a range of flowers from the flimsy sheet. Remember to cut out some flies. Paint your wooden embellishments. For the oval shape under my photo, I used a left over piece from my last project. I painted the other chipboard with a range of greens and pinks and when dry, added watered down white chalk paint to the edges to add depth. 

To assemble, start by adding your over frame. I added small pieces of chipboard to raise it up so you can slide other pieces underneath. Add your photo - remember to distress the edges and raise it up with some more foam tape or spare wooden chipboard leftovers. 

Start by adding your wooden flowers and leaves to set the main base and add your flimsy flowers. Remember so mix up the different colours. Finally add your flies and add some quirkiness. 

I hope you enjoy this page and also the iCraft Range. click on the link below for the online store. 

Products listed below are link to the online store. 

https://tinamarie.com.au/shop


Tuesday 22 March 2022

ICraft Australia - A little bit of prettiness


 Time to have some fun and create something pretty. I love the iCraft frames and wanted to create pinky prettiness and sparkle. I chose a beautiful oval frame and painted the pieces with chalk paint Coconut Milk.  Once dried, set aide some of the pieces to use for a project on another day and kept the larger pieces for the bottom of the frame. 

Cut the clock face from the decoupage paper. glue onto the oval base. Put aside. Paint the edges of oval out piece and smaller wooden pieces with watered down Radiant Raspberry chalk paint. You only want a hint of colour on the edges. When dry, rub the edge lightly with Romantic Pink wax. Just a hint of waxy pinkness. Paint the remaining wooden pieces with Minnesota Pines (one of my favourite colours) and dab some dark brown on the honey cone pieces. 

Start to make your frame. I have layered some fine gauze on the main base and then glued some of the honey cone pieces to peek just form the left side edge. These pieces will also raise up the oval frame to help you place some of the flower stems and other wooden pieces underneath. Layer the oval edge frame on top and build your frame by adding flowers. I start with the larger ones and build the smaller ones around. It works if you don't have the flowers matching each side. Move the flowers around until you are happy. 

I have used iCraft larger flowers and a range of their smaller ones - choose complimentary colours to add depth. Tuck your wooden leaves in and around to partly fill in the centre of the frame. Use the long stemmed mulberry flowers to fill in the spaces between the main flowers. Finally add in some of the flimsy leaves . 

Fill in the inside of the frame with some of the arty stones. Top with fine gauze strands on the top of the flowers and glue crystal shimmer  along the gauze strands and petals of the flowers to add some bling. Add a final dab of pink wax along the edges of some of the flowers. 


The key to putting the frame together is to have a play around with the flowers, wooden leaves until you are happy with the position of them. 

 I hope you enjoy my pretty pink frame. for more product information, scroll down below and click on the product to link to the store. 

Online store : https://tinamarie.com.au/shop


Sunday 6 March 2022

Drive in Movie night - Mintay Papers Mamarazzi


I love Mintay Papers and happy to sit and do lots of fussy cutting form their paper range to complete a project. This paper range is called Mamarazzi and is perfect for scrapbooking photos of my granddaughter at a drive in move night. Not many of them left now in Australia. 


I decided not to do a mixed media page so some fussy cutting, and a bit of watercolor pencil outlines, perfect Dusty Attic chippie and a flick of some iCraft Coconut Milk chalk paint. 


I hope you enjoy :)